Even though astronomers now enjoy analyzing the highest quality images ever taken, very few of these images are the same ones taken by the telescope.
Astronomical image processing comes in two forms: preprocessing and filtering. Preprocessing is the simpler of the two – and is often done automatically. Filtering, on the other hand, incorporates more sophisticated techniques and often has very desirable results.
Preprocessing
No matter how high a
quality of instrument an astronomer uses, there will almost always be some sort
of flaw in the equipment. Even the
most expensive and common electronic photography instrument, the “Charge
Coupled Device,” has its weaknesses.
These CCD’s contain thousands of individual light-capturing cells to
form a complete picture. When one
of these cells does not operate exactly the same as the others, the part of the
picture that it captures will have “noise.”
Preprocessing also helps to remove scratches, smears, and dirt from traditional photographic images.
How is this done?
Preprocessing mainly consists of two operations: “flat-field calibration”, and “noise reduction.”
Our equipment might have several flaws (such as quirky CCD cells or a scratched camera lens,) and we know that the flaws will always be there. To remove these errors from our picture later, we must first take a picture of a “flat field.” To crate our “flat field”, we need to take a picture of a uniform surface. This can be a white piece of paper, or a uniform area of the sky. Please save this image of a contrived flat field picture for use later on.
|
|
|
A contrived flat-field |
Since we know that the picture we took is of a uniform surface, any errors in the picture are due to our equipment. When we really begin taking pictures, we can electronically remove these known imperfections.
Noise Reduction
Another problem with astronomy is that random bits of interference often pollute our image. Noise reduction algorithms use a process very similar to the one that our brain uses in movies. For example, when we see a paused image on a VCR we often notice an unsightly amount of “speckling.” Although this speckling still exists while the movie is playing, our minds are able to ignore (filter) it.
Over time, each individual element of a picture (pixel) is covered only briefly by bits of noise, so a noise reduction filter combines many images to reduce the noise. For example, imagine the very top left pixel of an image. When we take many pictures, this pixel might be covered by noise in a few of them – but the other 15 or 20 pictures show the pixel as it should be. A noise reduction filter then simply realizes that the speckle of noise doesn’t belong and discards it.
When scientists do not have access to a set of images, they must settle for a lower-quality noise-reduction scheme. This simpler algorithm averages each pixel of the image with the few pixels surrounding it. Unfortunately, this method often blurs the target picture so must be done with care.
To explain the process of filtering, we will work through an example using Adobe’s excellent image processing software, “Photoshop.” Although not specifically designed for astronomical image processing, it is powerful enough to do many things we need.
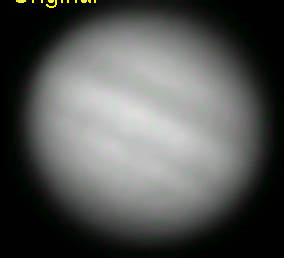
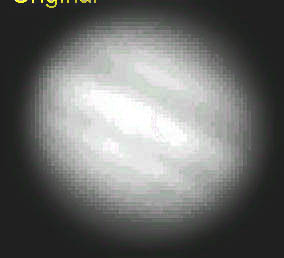
First, let us start with an image of Jupiter taken on an average night. Unfortunately, we can see very little detail because of our horrendous camera! However, we have our flat-field calibration picture that we can use to remove most of the artifacts. Please save this image so that we can fix it.
|
|
|
A picture of Jupiter with interference |
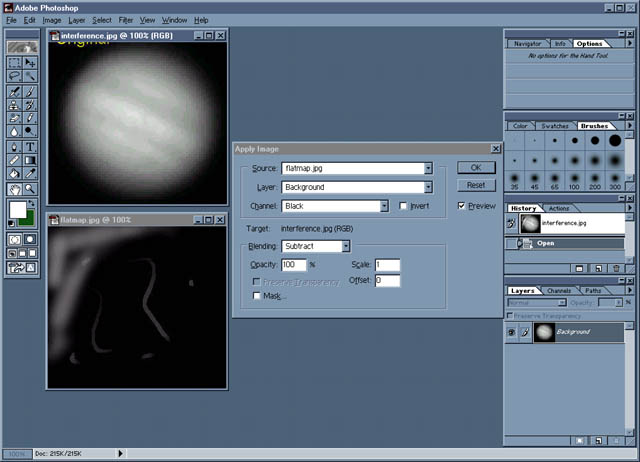
In Photoshop, open both the interference picture, and the flat-field calibration picture.
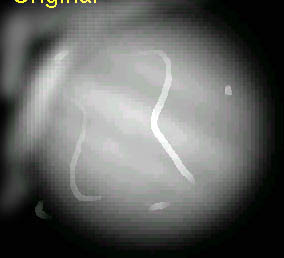
With both pictures open, click the title-bar of the interference picture. From Adobe’s menu, choose “image”, then “apply image.” As the “source,” choose the flat map image that you just loaded. As “blending,” choose “subtract” and then press “OK.” Your screen should resemble this one.
Adobe Photoshop has now subtracted the flat-field image from our originally marred picture. Now is a good time to save the file – I call mine “fuzzy Jupiter”.
 |
|
Jupiter with interference removed |
Because the flat-field used in this example was contrived (and added to the picture of Jupiter manually), our restored version probably looks more perfect than a usual flat-field subtraction would. Do not be dismayed, though – flat field reduction is a staple of modern astronomy. The "Wide Field Planetary Camera" on the Hubble Space Telescope is an example.
Unsharp Masking
The second most common filter used in astronomical image processing is the “unsharp mask.” Originating from the fields of traditional photography, unsharp-masking combines an image with a blurred version of itself to increase detail. Although Photoshop has the capability to automatically unsharp-mask an image, we will do it manually for interest’s sake.
Now that we have performed our flat-field subtraction, we can close the window that contained the flat-field.
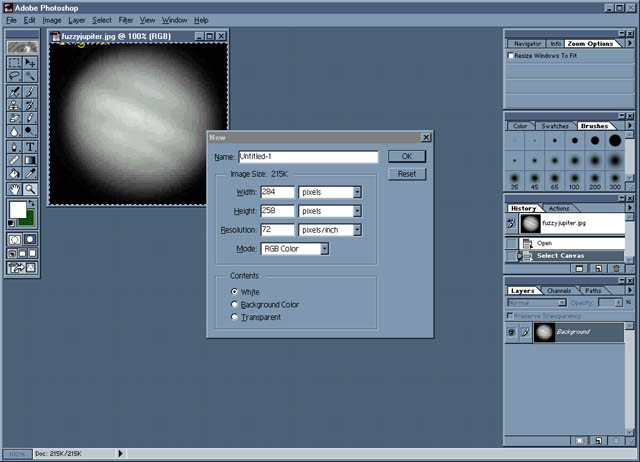
The next step in unsharp-masking is to create the mask itself. Once again, click on the title-bar of “fuzzy Jupiter.” From Adobe’s menu, choose “Select,” then “All.” Next, choose “Edit,” then “Copy.” We have just copied our picture onto Windows’ clipboard so that we can “unsharpen” it.
Next, choose “File,” then “New.” Accept Photoshop’s default values – the program is smart enough to make a new image the same size as the image on the clipboard. Your screen should resemble this one. With your new file open, choose “Edit,” then “Paste.” We now have a replica of the image we started with.
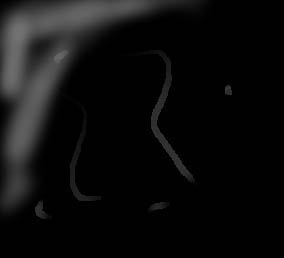
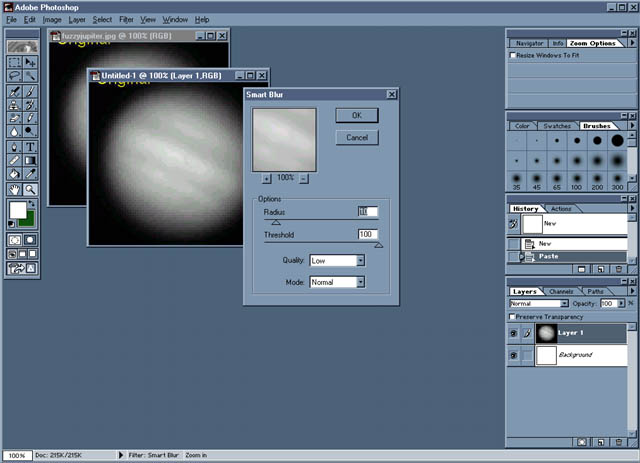
To unsharpen the image, choose “Filter,” then “Blur,” then “Smart Blur.” Choose the “Radius” to be about 10, and the “Threshold” to be about 100. This screen shows the smart blur dialog box. Similar to the technique of noise reduction discussed earlier, the Smart-Blur averages all the pixels over the selected radius -- in our case 10. This step requires some experimentation to obtain the best results, but in our case 10 is about right.
Now is a good time to save the new picture. I will call mine “blurred Jupiter.”
 |
|
Jupiter after "Smart Blur" |
The next step in unsharp-masking is to change the contrast of the fuzzy images.
To change the contrast, select “Image,” then “Adjust,” and finally “Brightness/Contrast.” Slide the contrast bar so that it is near -15. In the end, we will be subtracting the two images so that the fine details in the final picture will be enhanced.
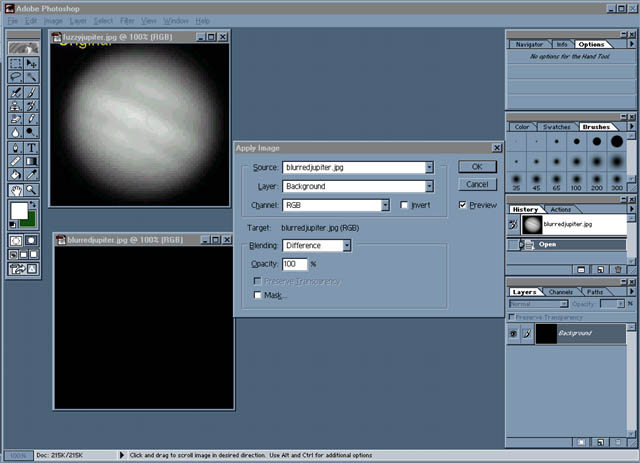
Now, we can apply the mask to our original “fuzzy Jupiter” image.
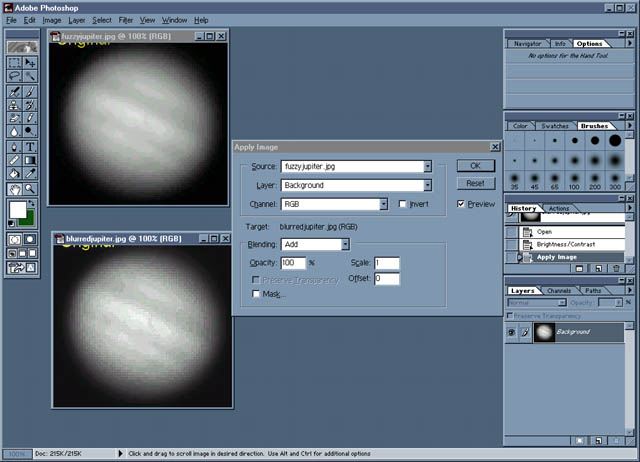
Making sure that the “blurred Jupiter” image is active, choose “Image,” then “Apply Image,” from Adobe’s menu. Select the source to be “fuzzy Jupiter,” the “Blending” to be “Difference,” and then press “OK.” The image will seem to disappear, but it’s just getting good! Your screen should resemble this one.
Next, apply
the “fuzzy Jupiter” image again, but this time choose “Blending” to
be “Add.” Now is a good time to
save our new file – I will call mine “fixed Jupiter.”
Look at what we’ve done!
By using “unsharp masking” rather than simple contrast adjustment we
have made Photoshop make the dark details darker and the light details
lighter! Although it is easy to over-apply
this filter (and destroy certain parts of the image), unsharp-masking is
often able to enhance detail we were not previously able to discern.
Best of all, since we are merely operating on digital images, no amount
of experimentation is too much.
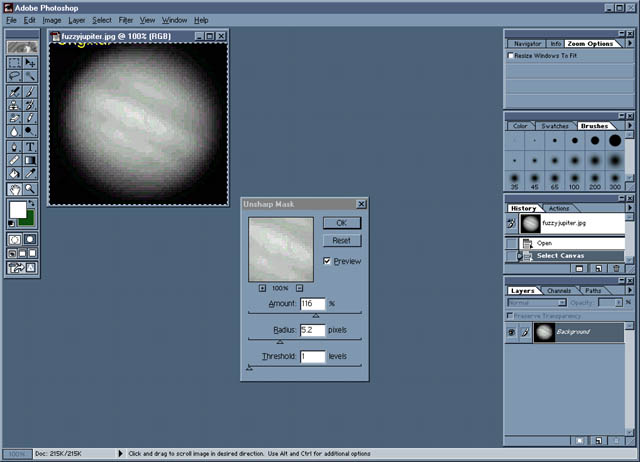
Fortunately, it is not usually this much work to apply an unsharp-mask. In fact, in Adobe Photoshop, you can access the filter by selecting “Filter,” then “Sharpen,” then finally “Unsharp Mask.” You will notice that Photoshop gives you several familiar options. First, “Amount” is the amount of contrast adjustment you would like to apply. Our earlier adjustment of –15 is equal to about 117% on this slider. The radius of 5 that we chose before is the same radius that Photoshop prompts you for. The final “Threshold” option is unique to Photoshop and essentially lets you determine how different a pixel must be from its neighbors in order to be sharpened.
 |
 |
|
Jupiter before enhancement |
Jupiter after enhancement |